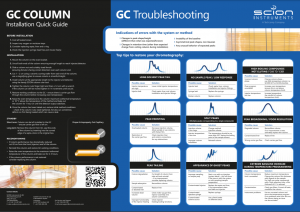
GC Column Installation - Quick Guide
Introducing our Gas Chromatography Column Installation Guide – your essential companion for ensuring a seamless and effective setup of GC columns in your analytical laboratory. The gas chromatography column is a critical component that directly influences the separation and detection of analytes in your samples. Proper installation is paramount to achieving accurate and reliable results in chromatographic analyses.
Whether you are establishing a new GC system or replacing an existing column, the information within this guide aims to empower you with the knowledge and skills necessary to ensure the proper installation and maintenance of your gas chromatography columns.
How To Install a GC Column
Before installing:
- Cool all heated zones
- Inspect any oxygen or moisture traps
- Consider replacing septa, liner and o ring
- Check the injection syringe (leak free and moves freely)
Install:
- Mount the column on the oven bracket
- Uncoil both ends of the column ensuring enough length to reach injector/detector
- Slide a column nut and suitably sized ferrule (ensuring ferrule is facing correct direction) over each column end.
- Cut 1 – 2 cm using a ceramic scoring wafer from each end of the column
- Install column at the appropriate length to the injector and detector, using the handy SCION column ruler tool
- Tighten the column nuts finger tight and then a ½ turn with a wrench. If the column can still be moved tighten in ¼ increments until secure.
- Restore working conditions to the GC – ensure there is carrier gas flow through the column before increasing oven temperature
- Raise the oven temperature to the column maximum isothermal temperature or 10 °C above the temperature of the method and bake out the column for 1 hour or until the detector output stabilizes.
- Once column has been baked out, restore initial method conditions – check if the column nuts need tightened, ferrules can sometimes deform on first being heated which can cause a leak.
Standby:
Short term: Column can be left installed in the GC – ensure carrier gas flow is left on.
Long term: Remove the column from GC, seal the ends of the column by inserting into the curved edge of a septa, store in the original box
Reconditioning:
If column performance has dramatically reduced cut 20 cm from the front (Injector) end of the column. Reinstall the column and restore GC working conditions. Raise the oven temperature to the maximum isothermal temperature of the column and bake out for 2-3 hours.
If the column performance is not restored consider replacing the column.
Download The Poster
Download our poster of the guide today and display it in your laboratory to assist you through any installation issues.
Further Assistance
If you require further assistance, please get in touch.

